Annotation with RAST
With RAST, it is now possible to get a fairly accurate annotation of a prokaryotic genome in about a day. We believe that the result is often very close to what most annotation groups can produce spending months or even man-years. This short tutorial describes our recommended approach to producing a rapid, quite-accurate annotation within about a day (sometimes less for short genomes, and often more for lare or diverged genomes).
The approach that we advocate is especially suited to annotating a genome that is quite phylogenetically close to an existing (presumably, well-annotated) genome or set of genomes. In particular, it works well for newly-sequenced pathogen genomes that are close to large groups of already sequenced genomes.
The proposed approach is as follows:
- Run your genome through RAST. This produces an initial annotation. There will probably be errors in gene calls, as well as errors in the assigned functions. Those get cleaned up in the next step.
- Once you have produced an initial annotation, you can "walk the genome" looking for genes that need to be deleted, inserted, or just re-annotated.
- Once you have made a quick pass through the genome, we suggest that you export the genome. You will probably wish to do this twice -- once to produce a Genbank formatted version (which can be used by many tools) and a second as a set of tab-separated files suitable for perusing in a tool like Excel.
Running Your Genome Through RAST
--------------------------------
For detailed instructions on how to get a RAST account, how to submit a genome for annotation and so forth, go to the writeup on using RAST in the SEED Servers Blog. The writeups there should help you get started. If you need help, you can email us as [email protected], but please realize that we are processing jobs for over 3000 users at this point.
Walking your Genome Using RAST
To begin looking at your annotated genome, you start at the "Job Details" page:
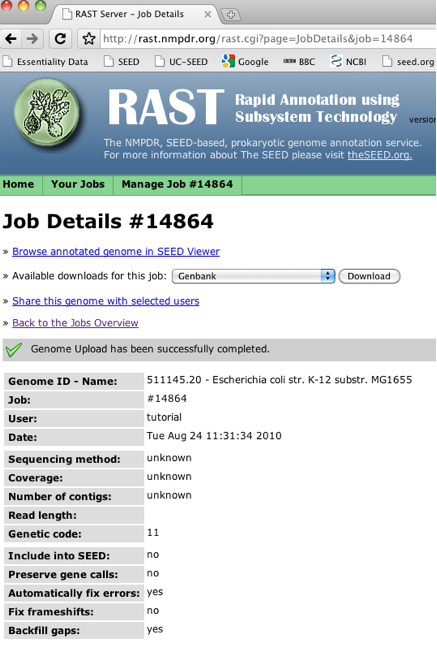
You click on "Browse annotated genome in SEED Viewer" to get started. This brings you to the "Organism Overview Page".
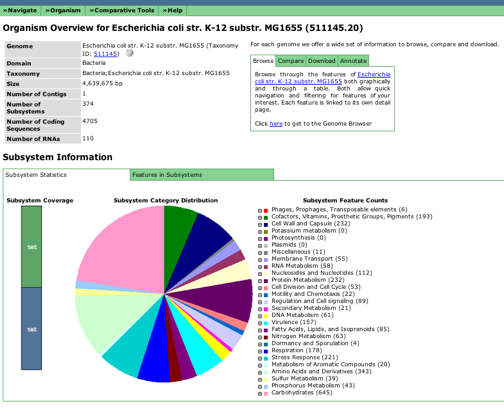
You need to find "Click here to get to the Genome Browser" in the upper right hand box to start the process of looking at your genome.
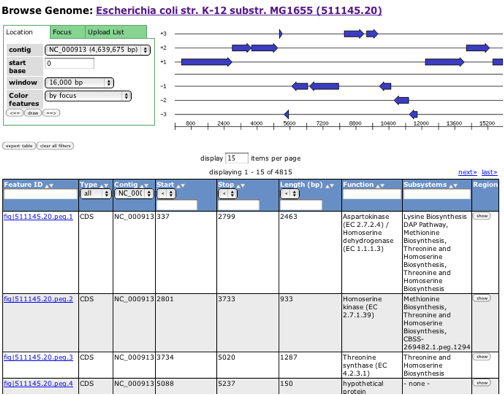
For our purposes today, Go to the first row in the table (the one for peg.1 -- that is, protein-encoding gene 1), and click on the feature ID. This brings you to the "Annotation Overview" page, which is where we will be spending a lot of our efforts.
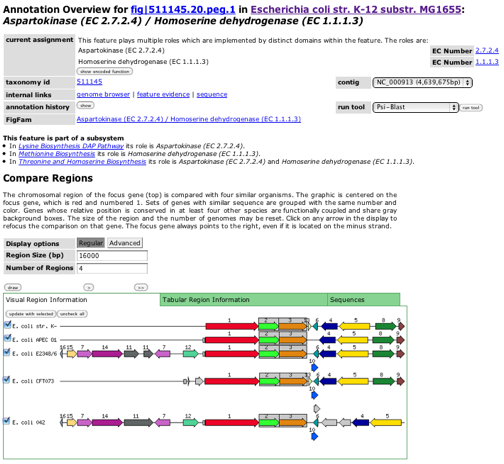
You should take a little time and study this page. It displays
- the genome name,
- the function assigned to the gene product,
- a history of how the annotation was derived,
- an EC number (if one is part of the assigned function, the link based on the EC number will be to the KEGG description of the EC),
- the ability to link to NCBI's Psi-Blast (to get both similarities to known genes and a summary of the recognized domains in the gene product), and (most importantly, we feel)
- a "compare regions" display that allows you to compare the genes in regions around similar genes in different genomes.
You should explore the links and gain some feel for how to get at the capabilities represented by this page (although there will be many that are beyond the scope of this tutorial).
Now, let us look at the compare regions display in a bit more detail. Note the data that appears for each gene if you hover over it. You should realize that the red gene in the first row of the display is the gene you are "focused on". The other red genes are similar to it and we have attempted to line up corresponding regions from several genomes. You can adjust the size of the regions, or the number of genomes that you wish compared. If you click on the "Advanced" options, you can adjust the threshold used to cluster genes into colors or to find corresponding genes in other genomes (as well as a few other options).
What we are proposing you do now, is move one screen full of compare regions after another, "walking through the genome" to see your annotations and possible errors. This may seem tedious, but for about a day's worth of clicking, you can gain a good sense of the quality and contents of your genome.
To navigate "up" by a full screen, click on ">>" (you can also go left or up by half-screens, but for our purposes, let's go a full screen each time).
Now that you can navigate, let us focus on three important things you can do to change your annotations:
- If you simply wish to change the annotation of a gene, you can "focus" on that gene, type in the corrected function in "new assignment", and click on change. We suggest that you then click on the "show" button associated with "annotation history" to verify that the change was recorded.
- If you wish to delete the gene you are focused on, just click on "delete feature", this will delete the gene and refocus you on one of the adjacent genes.
Exporting Your Genome from RAST
-------------------------------
Exporting your annotations from RAST is fairly straightforward. You go back to the Organism Overview page, click on "Download" and follow the instructions (see this post showing how)
==========================
Good luck, we hope that you do take the time to try our recommended approach, and we hope that it works as well for you as it does for us.
Suggestions on how we could improve the simple set of tools we provide
are welcome.